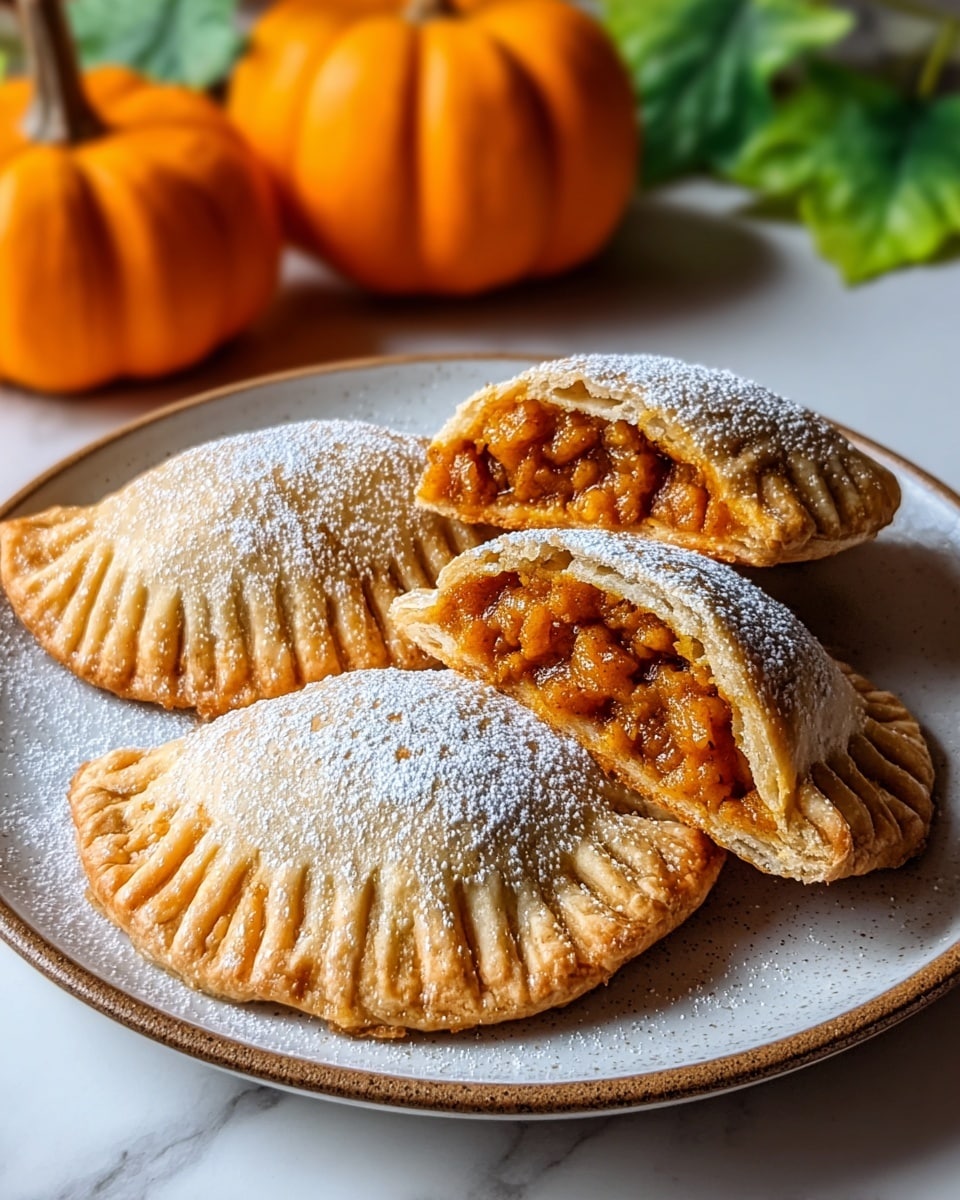
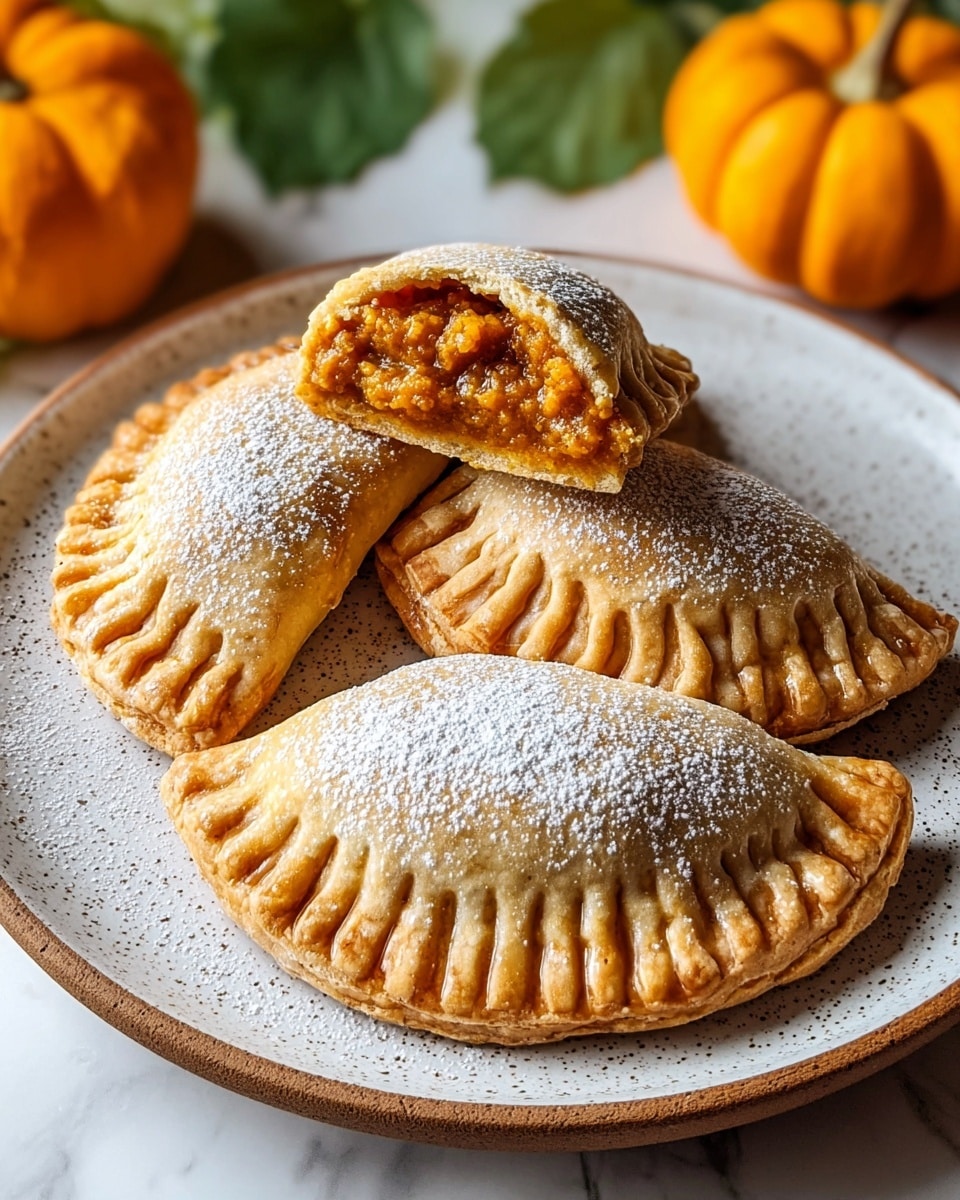
Pumpkin Hand Pies Recipe
Introduction
Hand pies are delightful little pastries filled with sweet or savory fillings, perfect for a cozy snack or a portable dessert. This recipe features a spiced pumpkin filling wrapped in a flaky, buttery crust that’s sure to become a favorite fall treat.
Ingredients
- 2 cups All-Purpose Flour (You can use whole wheat flour for a heartier option.)
- 2 tablespoons Granulated Sugar
- 1 teaspoon Salt
- 1 cup Unsalted Butter (cold and cubed) (Key to achieving a flaky crust.)
- 6 tablespoons Ice-Cold Water
- 1 cup Pumpkin Puree (Sweet potato puree works beautifully as a twist.)
- 1/2 cup Brown Sugar
- 1 teaspoon Ground Cinnamon
- 1/4 teaspoon Ground Nutmeg
- 1/4 teaspoon Ground Ginger
- 1/4 teaspoon Ground Cloves
- 2 tablespoons Coarse Sugar (For topping.)
- 1 Egg (beaten, for brushing tops)
Instructions
- Step 1: Whisk together the all-purpose flour, granulated sugar, and salt in a large bowl. Cut in the cold, cubed butter using a pastry cutter or your fingers until the mixture resembles coarse crumbs.
- Step 2: Gradually add the ice-cold water, mixing gently with a fork until the dough just begins to come together. Form the dough into a disk, wrap it in plastic wrap, and refrigerate for 30 minutes.
- Step 3: Preheat your oven to 375°F (190°C) and line a baking sheet with parchment paper.
- Step 4: In a separate bowl, combine pumpkin puree, brown sugar, cinnamon, nutmeg, ginger, and cloves. Mix well to create the filling.
- Step 5: On a floured surface, roll out the chilled dough to about 1/8-inch thickness. Cut out 4-inch circles using a round cutter or a glass.
- Step 6: Spoon about 1 tablespoon of the pumpkin filling into the center of each dough circle.
- Step 7: Fold each circle in half over the filling and press the edges together to seal. Use a fork to crimp the edges for a tight seal.
- Step 8: Brush the tops of the hand pies with the beaten egg, then sprinkle with coarse sugar. Use a sharp knife to cut small slits on top of each pie to allow steam to escape during baking.
- Step 9: Place the hand pies on the prepared baking sheet and bake for 20-25 minutes, or until they are golden brown and the filling bubbles through the slits.
- Step 10: Remove from the oven and cool on a wire rack for a few minutes. Serve warm for the best flavor and texture.
Tips & Variations
- For a richer crust, chill the butter and water thoroughly before making the dough.
- Try substituting the pumpkin filling with apple-cinnamon or berry preserves for different flavors.
- If you prefer a sweeter crust, add a tablespoon of sugar to the dough mixture.
- Use whole wheat flour for a nuttier texture and more wholesome taste.
- Brush tops with milk instead of egg for a lighter finish if you want to avoid eggs.
Storage
Store cooled hand pies in an airtight container at room temperature for up to 2 days. For longer storage, keep them refrigerated for up to 5 days or freeze for up to 2 months. To reheat, warm in a preheated oven at 350°F (175°C) for 10 minutes or until heated through and crispy.
How to Serve
Serve this delicious recipe with your favorite sides.
FAQs
Can I make the dough ahead of time?
Yes, you can prepare the dough up to 2 days in advance. Keep it tightly wrapped in plastic wrap and refrigerated until ready to use.
What can I use instead of pumpkin puree?
Sweet potato puree is an excellent substitute with a similar texture and taste. You can also try applesauce or mashed cooked squash depending on your flavor preference.
PrintPumpkin Hand Pies Recipe

These hand pies feature a flaky homemade crust filled with a spiced pumpkin filling, making them a perfect handheld treat for fall or any festive occasion. The buttery dough is filled with a sweet blend of pumpkin puree and aromatic spices, then baked to golden perfection and topped with coarse sugar for a delightful crunch.
- Prep Time: 15 minutes
- Cook Time: 25 minutes
- Total Time: 40 minutes
- Yield: 8 hand pies 1x
- Category: Dessert
- Method: Baking
- Cuisine: American
Ingredients
Dough
- 2 cups All-Purpose Flour (or whole wheat flour for a heartier option)
- 2 tablespoons Granulated Sugar
- 1 teaspoon Salt
- 1 cup Unsalted Butter (cold and cubed)
- 6 tablespoons Ice-Cold Water
Filling
- 1 cup Pumpkin Puree (sweet potato puree works as a twist)
- 1/2 cup Brown Sugar
- 1 teaspoon Ground Cinnamon
- 1/4 teaspoon Ground Nutmeg
- 1/4 teaspoon Ground Ginger
- 1/4 teaspoon Ground Cloves
Topping
- 2 tablespoons Coarse Sugar
- 1 Egg (beaten for brushing)
Instructions
- Prepare the Dough: Whisk together the all-purpose flour, granulated sugar, and salt in a large bowl. Cut in the cold, cubed unsalted butter using a pastry cutter or your fingers until the mixture resembles coarse crumbs.
- Form the Dough: Gradually add the ice-cold water, mixing gently just until the dough comes together. Shape it into a disk, wrap in plastic wrap, and refrigerate for 30 minutes to chill and firm up.
- Preheat Oven and Prepare Baking Sheet: Preheat your oven to 375°F (190°C). Line a baking sheet with parchment paper to prevent sticking and ensure even baking.
- Make the Filling: In a separate bowl, combine the pumpkin puree, brown sugar, ground cinnamon, nutmeg, ginger, and cloves. Mix well to evenly distribute the spices and sugar.
- Roll and Cut Dough Circles: On a lightly floured surface, roll out the chilled dough until about 1/8 inch thick. Using a 4-inch cutter, cut out circles from the dough.
- Fill and Seal Pies: Place one tablespoon of the pumpkin filling in the center of each dough circle. Fold the dough over the filling to create a half-moon shape and seal the edges firmly using a fork to prevent leaks during baking.
- Add Topping and Vent: Brush the tops of the hand pies with beaten egg for a golden finish. Sprinkle with coarse sugar for added texture and sweetness. Use a knife to score small slits on the top of each pie to allow steam to escape while baking.
- Bake the Hand Pies: Arrange the pies on the prepared baking sheet and bake in the preheated oven for 20-25 minutes, or until the crust is golden brown and the filling bubbles through the slits.
- Cool and Serve: Remove the hand pies from the oven and cool on a wire rack for a few minutes. Serve warm for the best flavor and texture.
Notes
- You can swap pumpkin puree with sweet potato puree for a different but delicious filling.
- Make sure the butter and water are cold to ensure a flaky crust.
- If you prefer a sweeter filling, increase the brown sugar slightly.
- These hand pies can be refrigerated for up to 3 days or frozen before baking for future use.
- For a vegan version, substitute butter with vegan butter and the egg wash with almond milk or a maple syrup glaze.
Keywords: hand pies, pumpkin hand pies, flaky hand pies, fall dessert, pumpkin dessert, handheld dessert, spiced pumpkin, homemade hand pies